
Welcome to all Revit beginners, experienced users and enthusiasts!
This page is aimed for everyone to share their tips & tricks and lifehacks relevant to Revit.
Please feel free share your knowledge below in the comments and the best posts will be published at the top of the page.
42 Revit Tips & Tricks
- Install the latest Revit updates and service packs.
- Use arrow keys to move objects a little bit or SHIFT+Arrow Keys to move a lot.
- Hide unreferenced view tags – check box in the print settings.
- Name your reference planes. Then you can select them as a work plane to draw on.
- Switch off Volume Calculations until exports are required.
- To quickly copy elements – drag them while holding down the Ctrl key.
- Configure the Revit keyboard shortcuts.
- Restart Revit over lunch break to reset cache.
- If the part of the drawing that you worked on disappeared from view, press F8 – Rewind to the lost view.
- Pin an element to keep it from moving around.
- When working on two screens, you can manually stretch the Revit space across both monitors by grabbing the window borders.
- If there is no need to make the 3D furniture, make it in 2d – this way you will facilitate the work with the model.
- When it is strictly required to make 3D furniture, place it in a separate linked file.
- Zoom into the area you are working in. This will reduce display calculations.
- Minimise the number of Levels within models and omit levels not that are not used.
- If some command freezes for a long time or you made a mistake with it, you can press Esc many times, the window “Stop this operation?” – Yes.
- Save often! Revit likes to crash at the most unexpected moments and not always with the possibility of a recovery.
- Create your own 3d view for each level using the 3D View Borders tool. This will facilitate your presentation of the 3D model.
- Export rendered images to hard drive instead of capturing them inside the project.
- Import high resolution images into a separate ‘Images’ .rvt file.
- If you customize your floor plan nicely, you don’t need to manually Photoshop it.
- If you do the same operation many times, then it makes sense to start learning Dynamo scripts and try to optimize the solution.
- Use the Autodesk Community templates initially. Great people did their best for you! But customize it to suit your needs.
- When copying families from project to project using typical combinations of Ctrl + C Ctrl + V, errors may occur in further work. The cleanest and most reliable way is through the Revit command “Load Family”.
- Revit is smart and the limitations in some features are not meant to be to make your life hard, but to avoid your mistakes.
- Sometimes Revit is too smart and then you have to deceive and cheat.
- It happens that sometimes it is easier to place an element to the side, and then move it to the right place.
- Hide at scales coarser than. Keep detail tags from showing up on
overall plans/sections/elevations - Don’t get fooled by the ads for “professional” Quadro graphics cards! The best option is Nvidia GeForce.
- When choosing to insert DWG into a project, the link is more often selected between link and simple import.
- Do not set up a black background, even if it is “this way” and for the last 10 years you have been working this way in AutoCAD.
- AutoCAD allows you to draw irresponsibly, Revit – not!
- Reinventing the wheel is cool, but many solutions already exist. Ask! Reviters are kind and helpful people.
- Use good computer mouse with additional keys. This is your working tool.
- In a heavy model for selecting elements, instead of the “Filter” option, it is faster to hide the unnecessary items through the “Visibility / Graphics”, and then select the necessary ones.
- Schedules can be linked to the Excel
- You can make very cool smart families in Revit.
- Avoid annotating 3D elements as 2D annotations, especially openings. There will be fewer mistakes if you do everything properly.
- Imposts load the model heavily. Maybe deliver them at the last moment?
- It is better to create a small group, and then add the remaining elements to it, rather than a large group at once.
- Make the walls transparent in 3d periodically to see what is behind them.
- Don’t go back to AutoCAD
Keyboard shortcuts
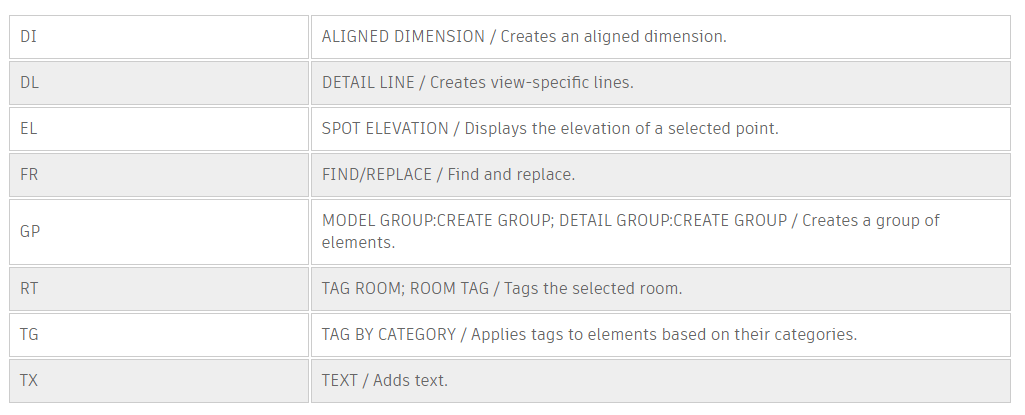
Download full Revit shortcuts list
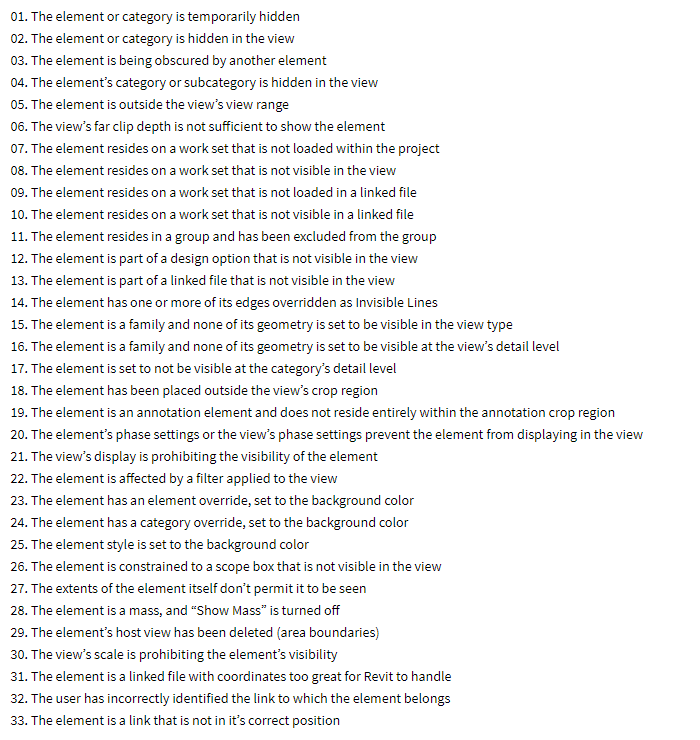
33 reasons why you can’t see it in Revit
Commands in the Modify Tab for MEP

When building engineering networks, it is not necessary to connect everything by manually. In some cases, it is easier to use the commands from the Modify block.
The first command is “Cut / Extend to Corner”. When we have two duct / pipes at an angle that need to be connected, it is easier to use this command than to drag each pipe manually to the point of intersection. But this command not limited to working with elements at an angle. You can also connect two coaxial sections of a duct / pipe. The command will connect them into one section, working also on 3D views.
The second command is “Trim / Extend One Element”. It is convenient to use this command to embed the branch of the duct / pipe into the line. This command is especially useful when connecting pipes with a slope to risers. In this case, the slopes will not go anywhere, the network will not break.
The third command is “Trim / Extend Multiple Elements”. Everything is similar to the previous command, but here you can connect several branches to one line. To do this, activate the command, click on the highway, and then click on the branches in turn. Everything will unite in beauty.

7 comments
Render settings.
If you want to speed up the rendering for the “final” image, you should not increase the frame resolution and decrease the rendering quality.
More resolution = more information = more time
It is better to decrease the resolution (or not increase it) and increase the quality, so there will be better quality at the edges of the model and less artifacts. The render will look better and there will be no loss in time.
Is it a trick or a weirdness .. I make a wireframe visual style on the plan, I try to put a mark on the overlap – it does not. I hide the lines – the mark is set. Then I make a frame back – the mark remains ..
If the model is large, and you need to rotate the camera in 3D around an object, then you just need to select this object and then rotate it. This is especially true in MEP (turning around the fitting)
CTRL + TAB allows you to switch open views
A little trick about the grid.
If you need to move a set of grids, for example, on the facade, you need the grid to end at the bottom of the building, that is, translate the end of the grid into 2D and then move it down.
1) Turn on cropping
2) We lower the trimming frame to the middle of the facade, the endings of the axes are automatically switched to 2D.
3) We drag by the end of any grid (the rest also move along the connection) down where necessary.
4) Return the clipping of the view to its original position, or turn it off.
This also works when there is scope.
1)Select the axes and attach them to the scope.
2) Further, as in paragraph 3
3) Drag for the end of any axis (the rest also move along the link) down where necessary.
The display of the properties window can “break”. That is, it is somehow cropped, fragmented, and as a result it is not displayed in its normal form. This happens quite often, usually when switching between family and project, or projects, or even views. The treatment is simple: minimize and expand the Revit window, the properties window will redraw and become normal. You do not need to minimize to the taskbar, but simply reduce / increase the window size.
“Convenient” creation of filters
1) Select objects in the model
2) Go to the Filters dialog without deselecting
3) Create filter – enter the name
4) Check the box “Hide unchecked”
5) Rejoice that you don’t have to look for what you need in the list